

How To Change Filter On Shark Vacuum


I'k pretty sure you know past now just how much I love my Shark vacuum cleaner. And given my readers' messages and comments, I know that many of you have Sharkys, as well. It'southward super important that you know how to clean a Shark vacuum to make certain it keeps performing at top efficiency both at present and for many years to come.
I dearest your messages. They make me smile considering I understand the range of emotion that comes with using a Shark vacuum for the get-go fourth dimension—from anaesthesia to flat out embarrassment.
Where on world did all of this dirt and debris come from? I can't believe what'southward been lurking in my carpet!
With all of the miles I've put on my numerous Shark vacs over the years, I've never had ane fail. And while the manufacturer boasts that Sharks never lose suction, that is predicated on common sense and regularly cleaning Sharky'due south canister, filters, rotating brush, and handle hose.
Contents
You'll know it's time when …
Step 1: Disassemble
Step 2: Clear obstructions
Step 3: Scrub canister make clean
Step 4: Shark vacuum filter cleaning
Stride 5: Untangle roller castor
Step vi: De-gunk handle hose
Step vii: Reassemble
FAQs
Signs a Shark vacuum needs cleaning
- Loss of suction: Information technology happens. A big fat hairy fuzzball or a venerable filter that'south stopped filtering can clog a vacuum and cut off suction. Any the cause, a loss of suction is the first sign that someone needs a good cleaning.
- Visible dirt left behind: When working at peak performance, a Shark vacuum volition never leave behind a trail of crumbs and debris. If it does, that's a clear indication it needs to be cleaned.
- Weird sound: You'll know information technology's bathtime for sure if your Shark sounds like it is gasping for air. That'due south because information technology is. And that tin be very hard on the vacuum'due south motor.
- Unpleasant odor: A Shark vacuum should never give off a stinky, muddy smell. If it does, consider that a clear sign this vacuum is overdue for a good cleaning.
How to clean a Shark vacuum
In the more than 12 years I've been using Shark vacuums, the visitor has come out with a crazy number of models. However, my feel is that all Shark vacuums have the same basic parts and operate in much the same mode.
What follows are general instructions. Your particular Shark model may vary. If you get stuck, ask in the comment expanse below, or refer to your owner'due south transmission.
What you'll demand
✅ warm water
✅ dishwashing liquid
✅ cleaning cloth
✅ woods skewer, or similar
✅ flashlight
✅ soft castor like a bottle brush
✅ scissors
Step 1: Disassemble
Brand sure the vacuum is disconnected from ability, and so accept information technology apart. Don't get crazy hither. We're non talking well-nigh removing screws or detaching wires. Remove the dust canister and the cream/felt filters, the HEPA filter and its comprehend, and the handle hose.
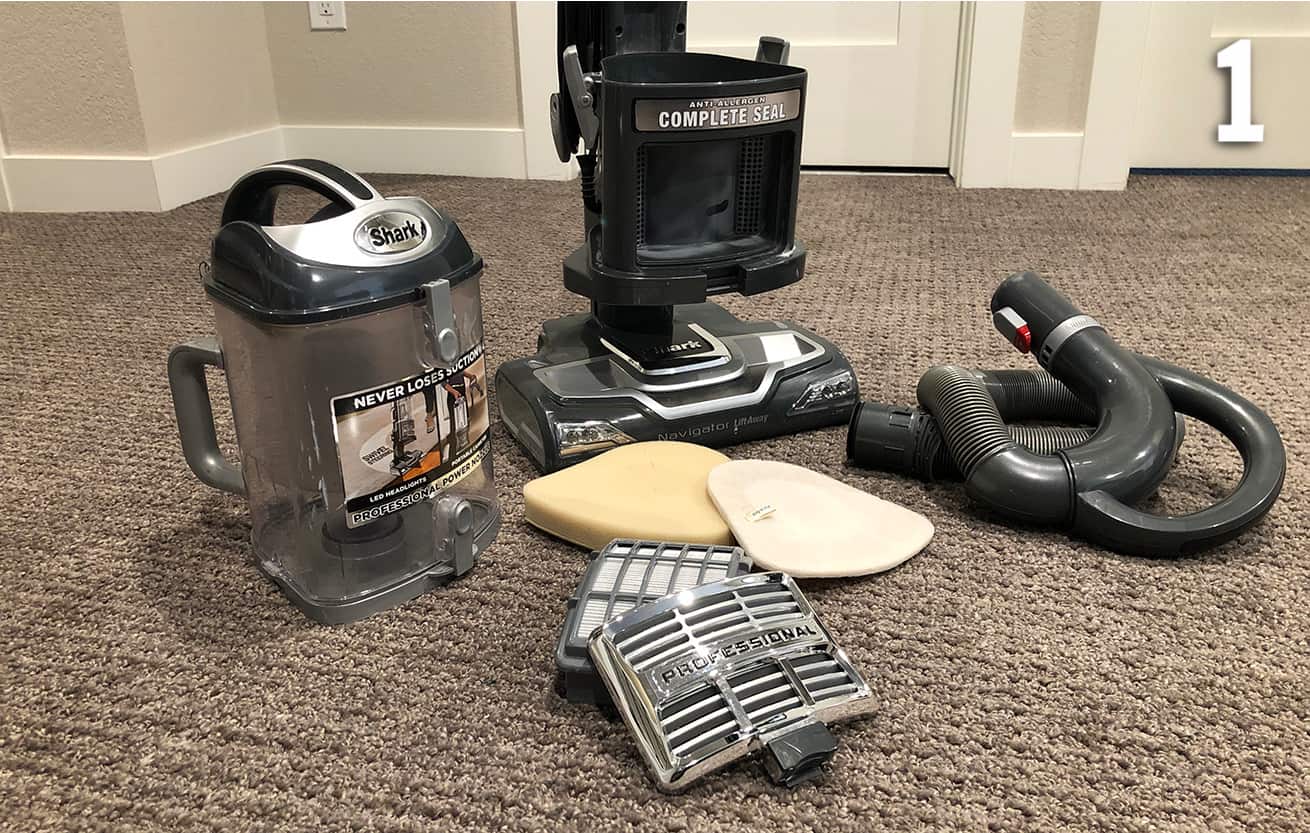
Take note of the placement of the filters and so that yous can supervene upon them in the same proper order. It's not difficult. Just pay attention.
Step 2: Check for and articulate obstructions
Check every opening. Y'all're likely to see fuzz, hairballs, and clinging dust. You may detect other things like a Lego brick or maybe even a sock!
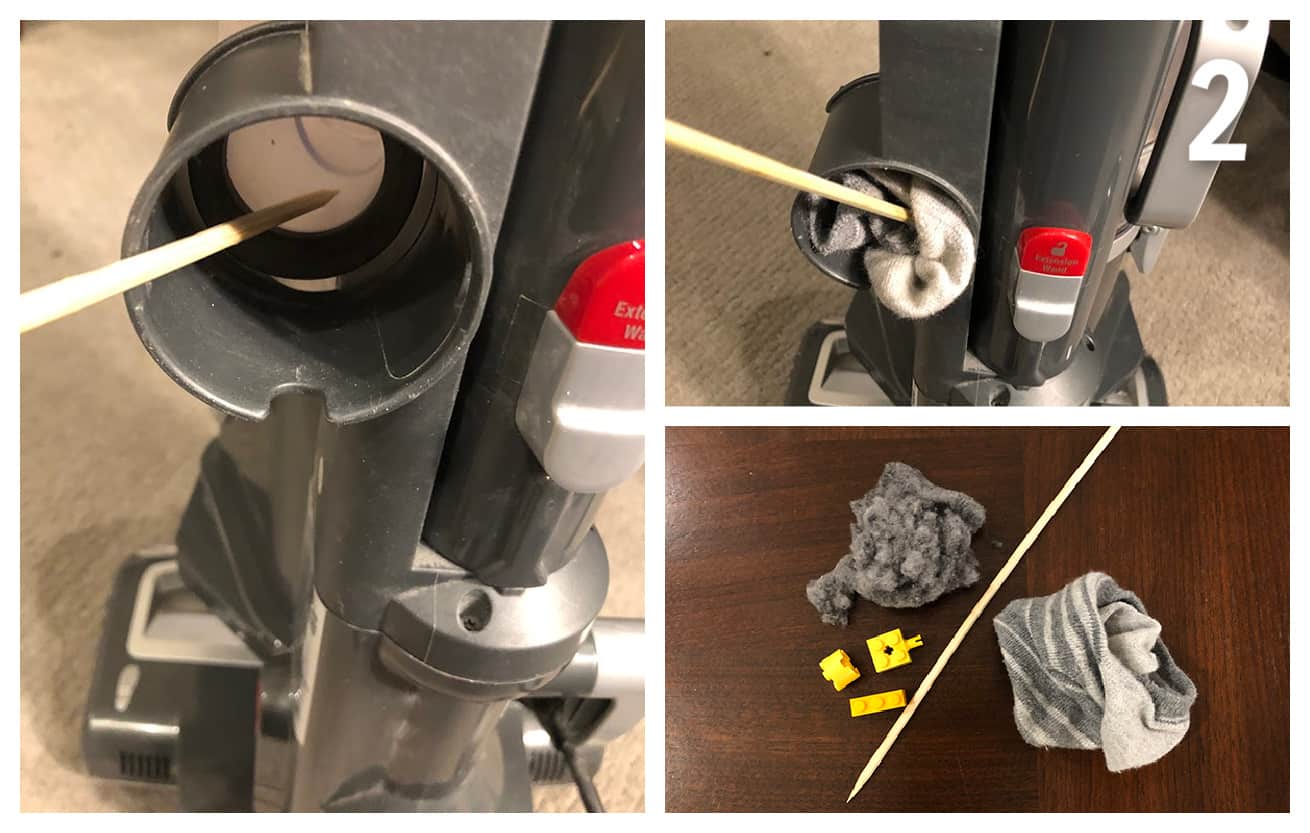
Remove all obstructions using your manus or a damp microfiber cloth. Can't attain it? A wooden skewer works well to fish out or release any weird accumulation.
Pro Tip
Make sure you are working in a well-lit surface area and using a flashlight to help search for blockages.
Step 3: Empty and clean the dirt canister
Open up both ends of the dirt canister over a trash tin and dump out whatever is in at that place. Now take the canister to a sink of warm soapy water.
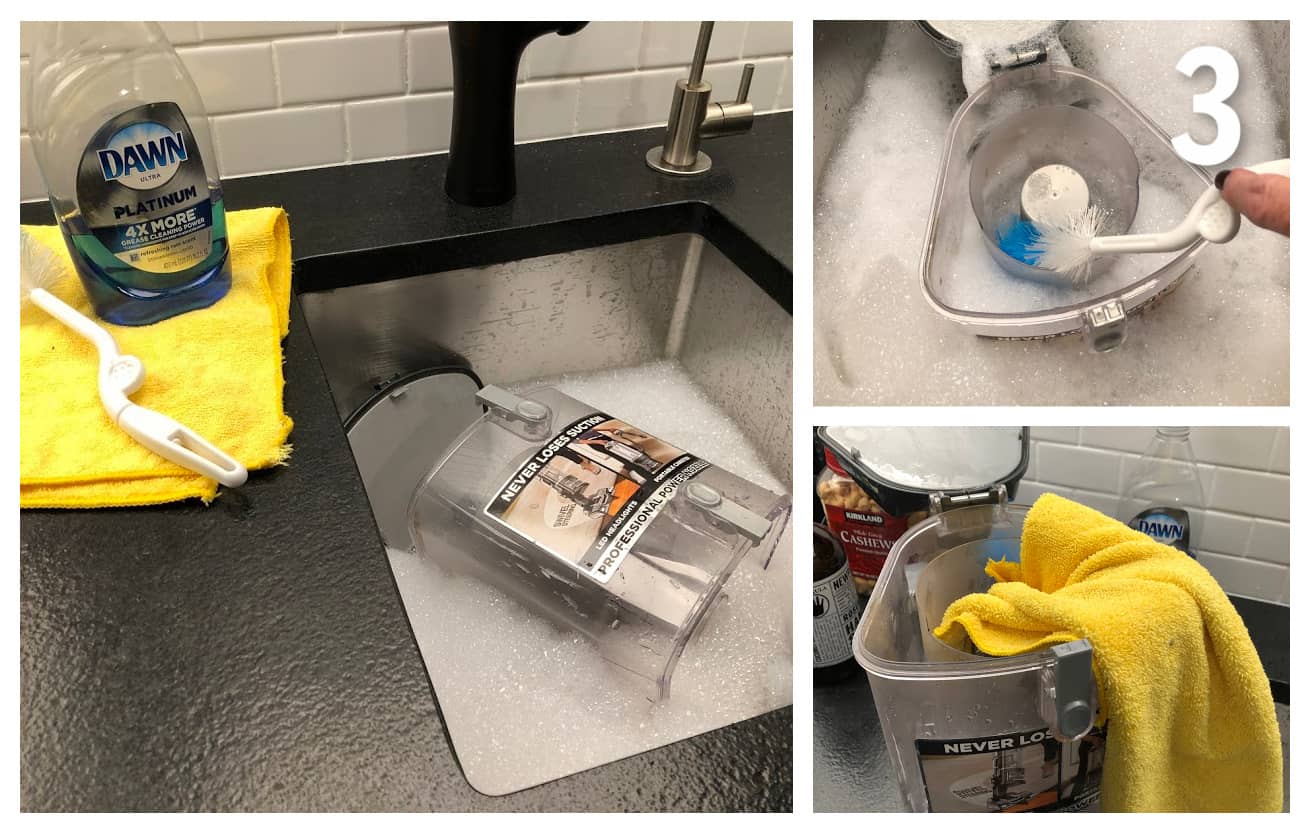
Open both ends of the dust canister and put it right into that warm bathroom. Using a long-handled brush or a rag, get inside that canister and scrub it clean. One time rinsed, dry it thoroughly with a good microfiber material.
- More: And then Disgusting I'm Embarrassed to Tell
Step 4: Shark vacuum filter cleaning
Shark vacuums have an first-class filter organization consisting of one or two (depending on the model) thick cream filters plus 1 made of felt; and a HEPA filter.
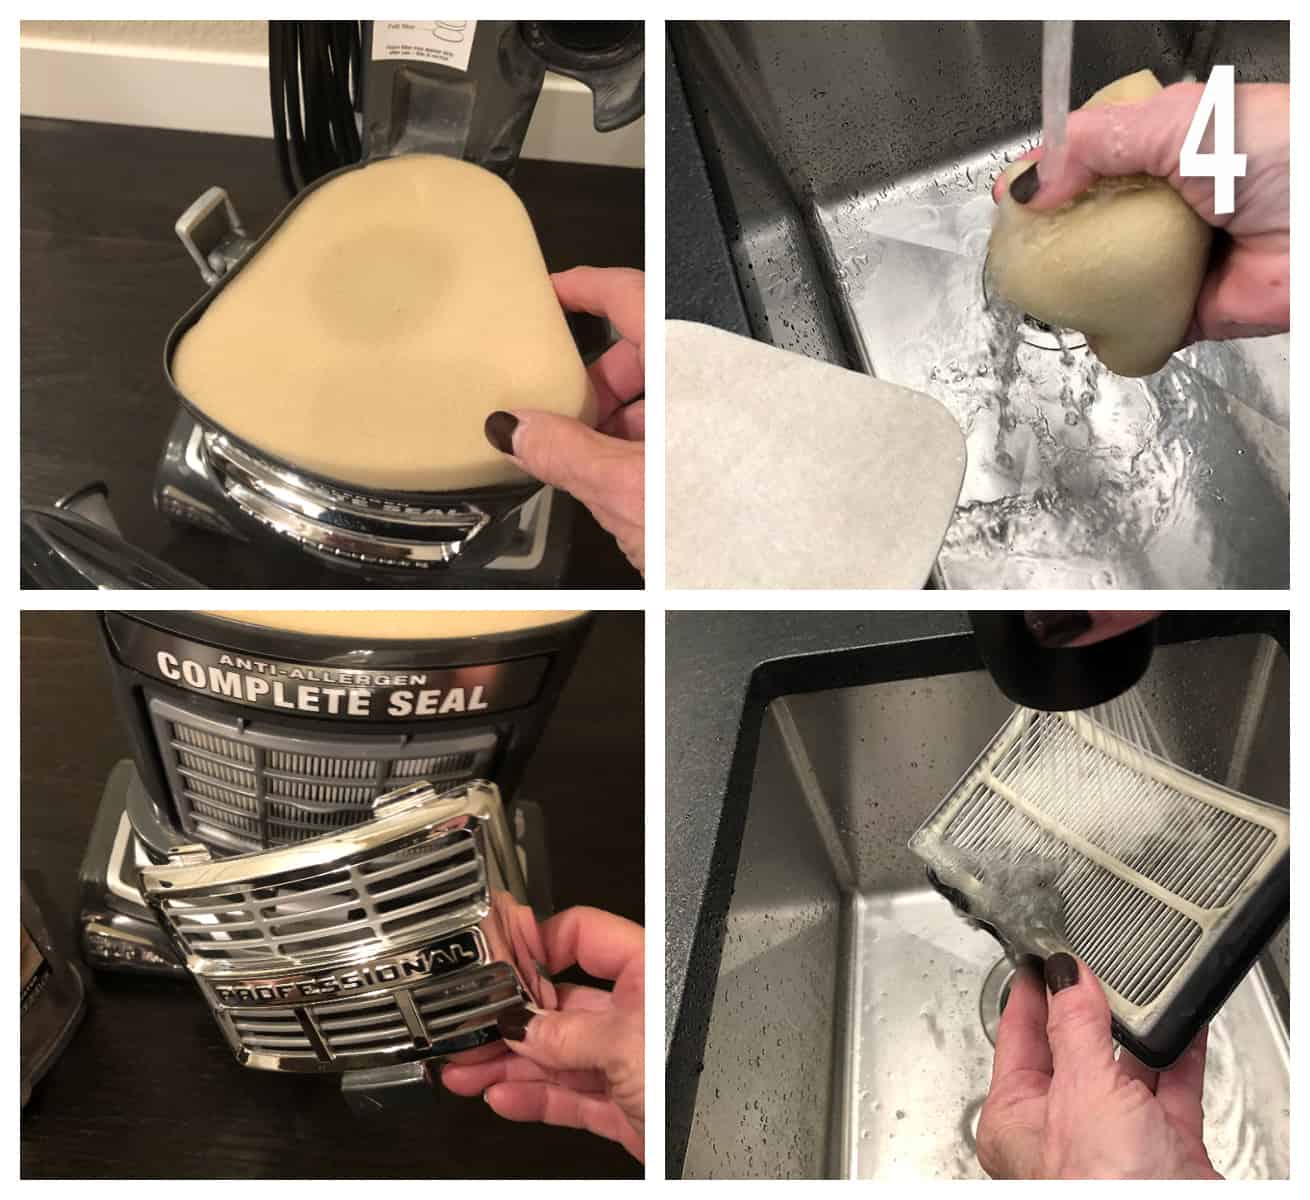
Foam/Felt Filters
Rinse the foam and felt filters in cool, clear water (manufacturer recommends no lather), existence peculiarly careful not to damage them.
It takes a good amount of squeezy and scrubbing of the foam filter to get it clean. Once cleaned and rinsed well, the filter(s) may or may not return to their new white appearance. Simply don't worry. As long as they are not torn, cleaved, or otherwise disintegrated, they'll be but fine, even if they remain stained.
Note: The manufacturer does non recommend washing the felt filter. I'm not too fond of dirty felt, and then I carefully manus wash and accept done and then many times with no problem. Do this at your own hazard.
HEPA Filter
Most Shark vacuum models have an additional filter—a HEPA filter. This is located on the lower front of the machine backside the filter grill (door). Firmly pull the door off to reveal the HEPA filter and pull out the filter. Rinse the filter well in clear water and allow it to dry fully.
Practise non return the filter(south) to the vacuum at this point. They must be completely dry commencement or prepare for mildew and mold—the last affair you ever desire growing inside a vacuum. Set the all the same wet filter(s) on the counter so they can air dry out. This may require an overnight stay.
- More: The Best Way to Vacuum Carpet is to Memorize this Routine
Footstep 5: Clean the rotating brush head
Next, lay the vacuum on the floor and so yous can come across the rotating brush. You may want to identify a purse or towel underneath to catch the debris and dirt you're well-nigh to release.
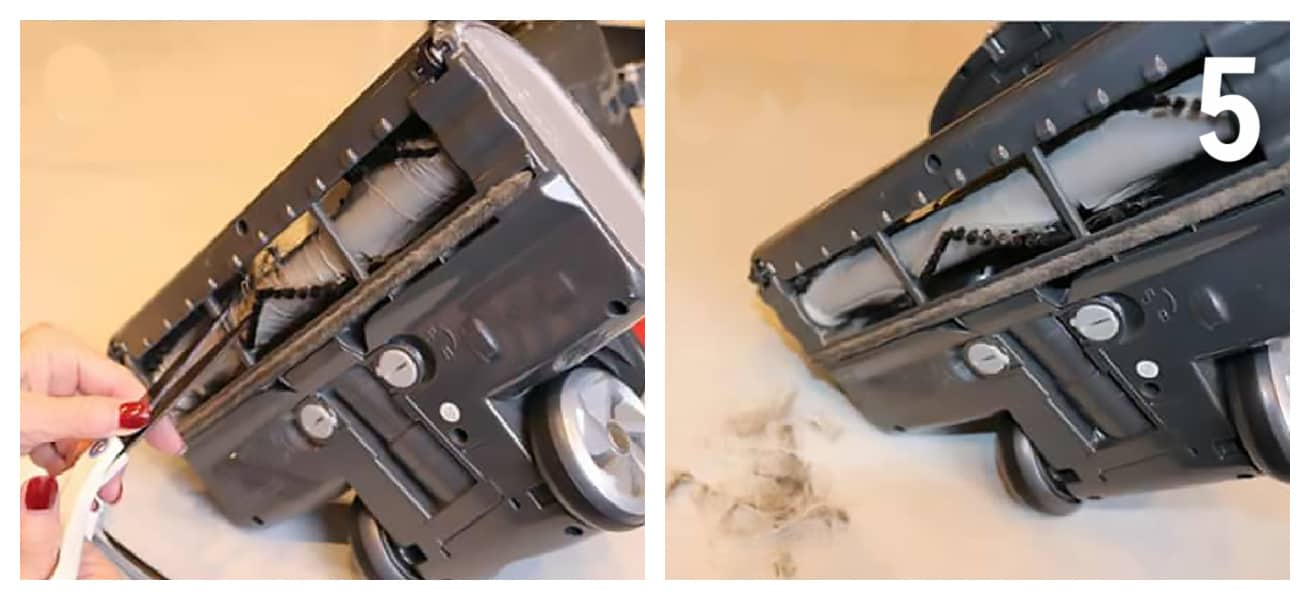
More than likely, you lot will see strings, hair, and other material wrapped around the castor. This is normal. I utilize scissors to cut through whatever has wound itself effectually the brush. That makes it easy to clean up the brush. Y'all may accept to pull and tug a bit, only information technology will come up off. Yous want to return the rotating castor to its overnice and clean status.
Step 6: Clean the handle hose
Over again, since I am non privy to every single Shark model, please check your owner's transmission earlier cleaning the vacuum handle hose. You lot want to make certain the hose on your model does not have any electrical components. None of my Shark vacuums always accept, only let'due south make sure.
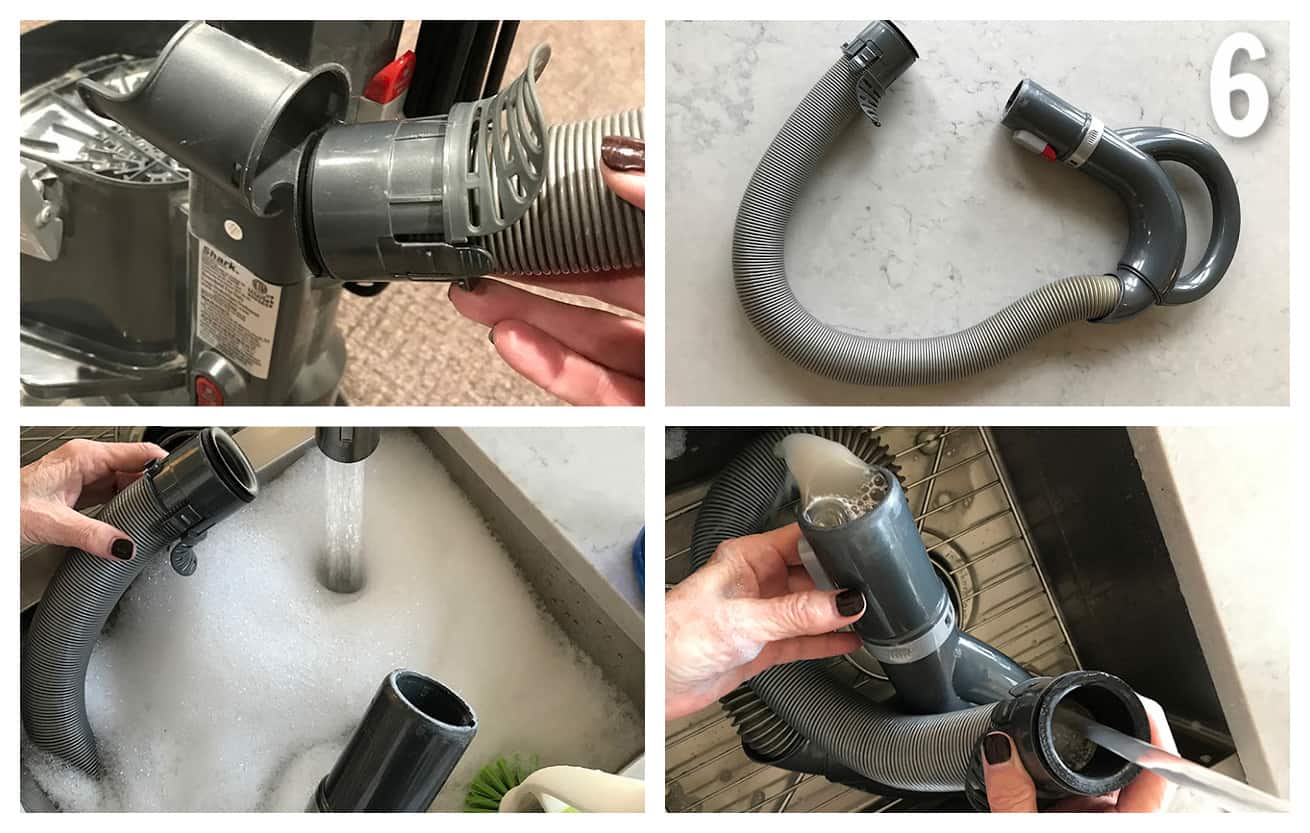
The handle hose on a Shark disconnects hands. When you lot practise this and take a look inside, you'll see that it is laden with sticky grit and grime. Removing all of that will aid your Sharky to proceed to perform smoothly.
Take the hose to your sink or tub of soapy water and drop it in and so it tin fill with water. Using a brush or rag, reach into the ends to clean it. Warning! Don't get anything get stuck, especially in that bendy part.
Allow the hose to sit down and soak for a while, to loosen the crud in the areas you cannot reach easily. Finish by running clean h2o from a faucet through the hose until it comes out clean and clear from the other terminate. Find a place to hang the hose vertically and so information technology can drip dry.
- MORE: How to Make clean Carpet Fifty-fifty if Information technology's Old, Stained, and Icky
Step 7: Reassemble the vacuum
One time the filters and handle hose are completely dry, reassemble your Shark vacuum.
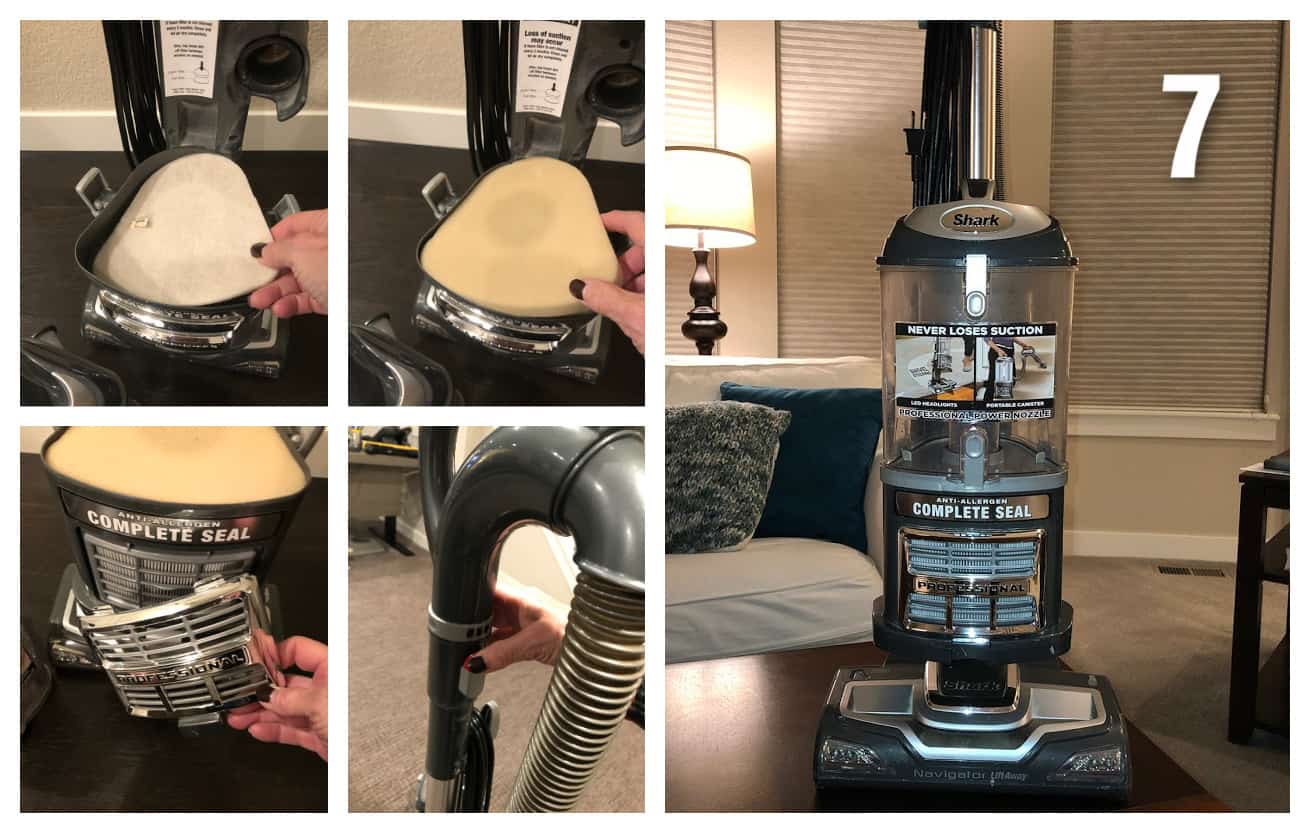
Replace the felt filter showtime. Side by side, replace the clean foam filter on top of the felt filter. Replace the HEPA filter and then the "grill" cover. Reattach the handle hose. Close both ends of the clay canister and lock it into place.
Enjoy your nice make clean, fresh Shark Vac!
FAQs
Why does my vacuum smell?
More than likely, you are non emptying the dirt canister frequently enough. Merely retrieve about what goes inside that dirt canister and as well gets trapped in the filters. It's clay and droppings from the outdoors, bits of nutrient, and other organic matter. Allowing that debris to remain in the dirt canister creates a breeding ground for bacteria and mold and the potential for a stinky situation.
How often should I clean a Shark vacuum and filters?
- Each use: Empty the dirt container after every utilise.
- Monthly: Shark vacuum owner manuals by and large instruct that the foam/felt filters should exist cleaned monthly.
- Quarterly: Every three months, take the vacuum apart (see above), give the dust canister, castor gyre, and hose a good cleaning.
- Annually: Clean the HEPA filter one time each year.
When should I supervene upon Shark vacuum filters?
Your owner transmission will most likely advise both the foam/felt and HEPA filters to be replaced once yous notice the car is losing suction, fifty-fifty subsequently cleaning the filters as mentioned above. That's a stiff sign that the filters are no longer effective.
To be on the safe side and since they are not expensive, my practice is to replace the foam/felt filters annually and the HEPA filter every bit needed.
Where can I get filters and replacement parts for my Shark products?
SharkClean.com carries just about every possible replacement part or accessory you tin imagine and for lots of Shark models, fifty-fifty those that are no longer in production. Every bit for filters, I compare prices at SharkClean with Amazon, where the filters for my Sharks are usually a chip less expensive. You tin can too detect possessor manuals for hundreds of models and exceptional back up at SharkClean.
There are so many models of Shark vacuums. Do you have a recommendation?
Y'all're right, there are many models to cull from! I am partial to the models with the Elevator-Away feature, making it easy and efficient to vacuum a staircase. And I adopt the Navigator line of Shark vacuums because they maneuver and then well.
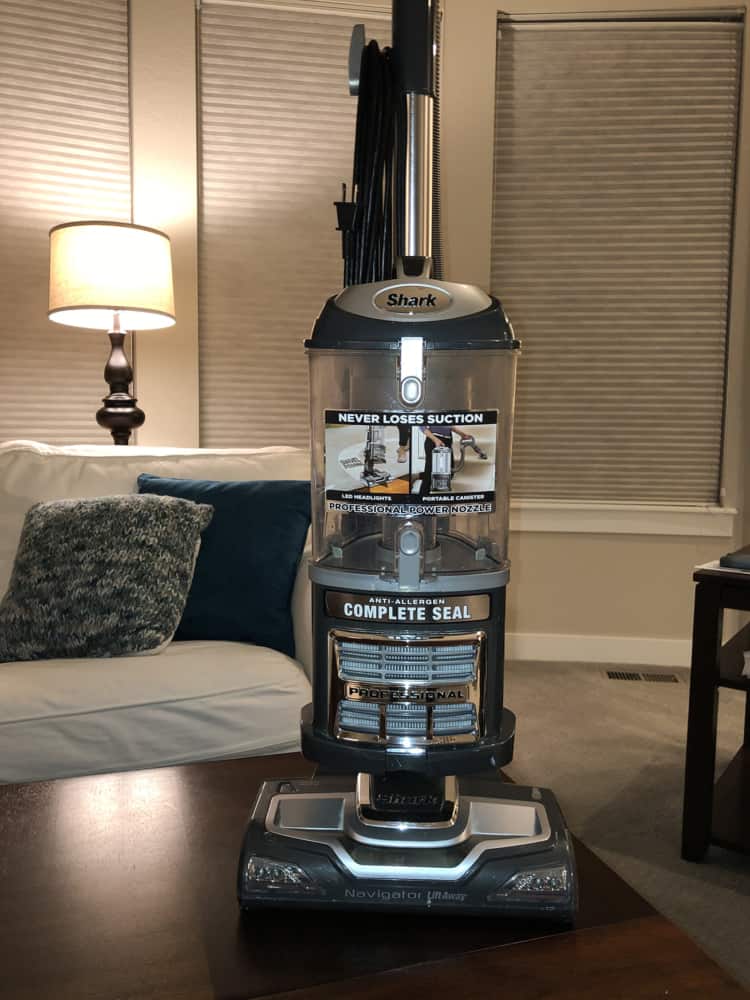
I purchased the vacuum in this photograph tutorial above in 2015. You wouldn't believe how many miles I have on it, and it still looks and operates as if new.
My current recommendation is this Shark Navigator Pro Lift-Away. It comes with several accessories including a pet power brush and crevice tool. Information technology weighs in at simply 13.7 lbs., which is merely one more than thing to dearest.
Everyday Cheapskate participates in the Amazon Services LLC Associates Plan, an affiliate advertisement program designed to provide a means for the states to earn from qualifying purchases, at no cost to y'all.
Original: 12-30-15; Republished with updated photos 3 -21-22
More from Everyday Cheapskate
 https://www.everydaycheapskate.com/wp-content/uploads/Collage3-1310-x-833.jpg 833 1310 Mary Hunt https://www.everydaycheapskate.com/wp-content/uploads/EC-Logo-by-Mary-Hunt-Tagline-Trimmed.png Mary Hunt 2022-03-21 00:ten:l 2022-03-21 06:29:16 How to Make clean a Shark Vacuum
  https://www.everydaycheapskate.com/wp-content/uploads/031016image.jpg 373 560 Mary Chase https://www.everydaycheapskate.com/wp-content/uploads/EC-Logo-by-Mary-Hunt-Tagline-Trimmed.png Mary Hunt 2022-03-eighteen 00:01:30 2022-03-18 xvi:xiv:10 Put a Big Smile on Your Face with a Dental Savings Plan
  https://www.everydaycheapskate.com/wp-content/uploads/homechef_1310x833.jpg 833 1310 Mary Hunt https://www.everydaycheapskate.com/wp-content/uploads/EC-Logo-by-Mary-Hunt-Tagline-Trimmed.png Mary Chase 2022-03-17 00:02:18 2020-05-17 06:54:29 How We Use Domicile Delivery Meal Kits to Cutting Food Costs
  https://www.everydaycheapskate.com/wp-content/uploads/laundry-two.jpg 833 1310 Mary Hunt https://world wide web.everydaycheapskate.com/wp-content/uploads/EC-Logo-by-Mary-Hunt-Tagline-Trimmed.png Mary Chase 2022-03-16 00:47:34 2022-03-16 08:29:49 half-dozen Means to Make Safety, Trouble-Costless, Bootleg Fabric Softener
  https://www.everydaycheapskate.com/wp-content/uploads/lite-bulb-thought-concept.jpg 833 1310 Mary Hunt https://www.everydaycheapskate.com/wp-content/uploads/EC-Logo-by-Mary-Hunt-Tagline-Trimmed.png Mary Hunt 2022-03-15 07:04:xvi 2022-03-xv 10:46:43 No More Sleeping Through the Alarm and More Tips and Great Ideas!
  https://www.everydaycheapskate.com/wp-content/uploads/clear-running-sink-drain.jpg 873 1310 Mary Hunt https://www.everydaycheapskate.com/wp-content/uploads/EC-Logo-by-Mary-Hunt-Tagline-Trimmed.png Mary Hunt 2022-03-14 00:54:25 2020-ten-27 19:31:09 6 Ways to Unclog a Bleed Without Using Caustic Chemicals
  https://www.everydaycheapskate.com/wp-content/uploads/081418image-2.jpg 844 1310 Mary Hunt https://www.everydaycheapskate.com/wp-content/uploads/EC-Logo-by-Mary-Hunt-Tagline-Trimmed.png Mary Hunt 2022-03-12 00:15:34 2022-03-fifteen 10:25:22 26 Surprisingly Useful Ways to Use Dryer Sheets Around the House
  https://www.everydaycheapskate.com/wp-content/uploads/sunshine.jpg 833 1310 Mary Chase https://www.everydaycheapskate.com/wp-content/uploads/EC-Logo-by-Mary-Hunt-Tagline-Trimmed.png Mary Hunt 2022-03-11 08:49:04 2022-03-eleven 09:35:57 Iii Reasons I Honey Cooking (and Baking!) with Sunshine
  https://www.everydaycheapskate.com/wp-content/uploads/Depositphotos_239958644_l-2015-e1593699508422.jpg 874 1310 Mary Hunt https://www.everydaycheapskate.com/wp-content/uploads/EC-Logo-past-Mary-Chase-Tagline-Trimmed.png Mary Hunt 2022-03-09 09:57:11 2022-03-09 ten:31:41 Instant Pot is Fabulous but Its Wearisome Cook Style is I Large Thwarting
 Please proceed your comments positive, encouraging, helpful, brief,
and on-topic in keeping with EC Commenting Guidelines


Source: https://www.everydaycheapskate.com/how-to-clean-a-shark-vacuum-and-filters/
Posted by: thorntontues1985.blogspot.com
0 Response to "How To Change Filter On Shark Vacuum"
Post a Comment